

@TOC
一.JSON
1.1JSON简介
JSON(JavaScript Object Notation)是⼀种轻量级的数据交换格式,易于⼈阅读和编写,同时也易于机器解析和⽣成。它基于JavaScript的⼀个⼦集,但尽管它来源于JavaScript,JSON是独⽴于语⾔的,可以被多种编程语⾔读取。以下是关于JSON的⼀些关键点: 基本结构: 对象:由键值对组成,⼤括号 {} 包围。 数组:由值的有序集合组成,⽅括号 [] 包围。 值:可以是字符串、数字、对象、数组、布尔值( true / false )或 null 。 语法规则: 键值对以 "key": value 的形式出现,键和值之间⽤冒号 : 分隔。 多个键值对之间⽤逗号 , 分隔。 所有键都必须是字符串,并且⽤双引号 " 包围。
1.2简单示例
因为之前我们在介绍序列化与反序列化时已经用到过json了,这里我们就不去再说它的用途什么的了。直接给一个简单的报文示例:
{ "name": "John Doe", "age": 30, "is_student": false, "skills": ["JavaScript", "Python", "C++"], "address": { "street": "123 Main St", "city": "Anytown", "state": "CA" }}1.3JSONCPP简介
1.3.1安装
xxxxxxxxxxsudo apt install libjsoncpp-dev1.3.2使用
使用时需要包含头文件:
xxxxxxxxxx同时需要连接库:
xxxxxxxxxx-ljsoncpp1.3.3数据转储相关
xxxxxxxxxxnamespace Json {enum ValueType { nullValue = 0, ///< 'null' value intValue, ///< signed integer value uintValue, ///< unsigned integer value realValue, ///< double value stringValue, ///< UTF-8 string value booleanValue, ///< bool value arrayValue, ///< array value (ordered list) objectValue ///< object value (collection of name/value pairs).};class JSON_API Value {public: void swap(Value& other); void copy(const Value& other); const char* asCString() const; String asString() const; Int asInt() const; UInt asUInt() const; Int64 asInt64() const; UInt64 asUInt64() const; float asFloat() const; double asDouble() const; bool asBool() const; bool isNull() const; bool isBool() const; bool isInt() const; bool isInt64() const; bool isUInt() const; bool isUInt64() const; bool isIntegral() const; bool isDouble() const; bool isNumeric() const; bool isString() const; bool isArray() const; bool isObject() const; // Array-API ArrayIndex size() const; bool empty() const; void clear(); void resize(ArrayIndex newSize); Value& operator[](ArrayIndex index); Value& append(const Value& value); Value& operator[](const char* key); Value& operator[](const String& key); void removeMember(const String& key); bool isMember(const String& key) const; String toStyledString() const;};}1.3.4序列化相关
xxxxxxxxxxnamespace Json{ class JSON_API StreamWriter { public: virtual int write(Value const &root, OStream *sout) class JSON_API Factory { public: virtual StreamWriter *newStreamWriter(); } }; String JSON_API writeString( StreamWriter::Factory const &factory, Value const &root); class streamWriterBuilder : public StreamWriter::Factory { public: Json::Value settings_; };}1.3.5反序列化相关
xxxxxxxxxxnamespace Json{ class JSON_API CharReader { public: virtual bool parse( char const *beginDoc, char const *endDoc, Value *root, String *errs) = 0; class JSON_API Factory { virtual CharReader *newCharReader() const = 0; }; }; class JSON_API CharReaderBuilder : public CharReader::Factory { public: Json::Value settings_; CharReader *newCharReader() const override; };}1.4二次封装及简单使用示例
Jsoncpp序列化流程
创建StreamWriterBuilder配置序列化参数(如缩进格式),通过newStreamWriter()生成写入器。写入器将Json::Value对象输出到字符串流,若写入成功则返回字符串形式,失败返回空值。
xxxxxxxxxxJson::StreamWriterBuilder builder;builder["indentation"] = ""; // 禁用缩进std::unique_ptr<Json::StreamWriter> writer(builder.newStreamWriter());std::ostringstream ss;int ret = writer->write(value, &ss); // 核心写入操作Jsoncpp反序列化流程
创建CharReaderBuilder并生成解析器,通过parse()方法将JSON字符串解析为Json::Value对象。解析失败时返回错误信息,成功则返回解析后的数据结构。
xJson::CharReaderBuilder builder;std::unique_ptr<Json::CharReader> reader(builder.newCharReader());Json::Value value;bool ret = reader->parse(str.c_str(), str.c_str() + str.size(), &value, &errors);
所以我们可以得到如下封装:
xxxxxxxxxx//util.h
namespace limeutil { class LimeJson{ public: static std::optional<std::string> serialize(const Json::Value& value); static std::optional<Json::Value> deserialize(const std::string& str); };} // namespace limeutilxxxxxxxxxx//util.cc
namespace limeutil { std::optional<std::string> LimeJson::serialize(const Json::Value& value) { Json::StreamWriterBuilder builder; builder["indentation"] = ""; // 去掉缩进 std::unique_ptr<Json::StreamWriter> writer(builder.newStreamWriter()); std::ostringstream ss; int ret = writer->write(value, &ss); if (ret != 0) { ERR("序列化失败!"); return std::nullopt; } return ss.str(); }
std::optional<Json::Value> LimeJson::deserialize(const std::string& str) { Json::CharReaderBuilder builder; std::unique_ptr<Json::CharReader> reader(builder.newCharReader()); std::string errors; Json::Value value; bool ret = reader->parse(str.c_str(), str.c_str() + str.size(), &value, &errors); if (!ret) { ERR("反序列化失败! {}", errors); return std::nullopt; } return value; } } // namespace limeutil然后我们编写一个测试示例:
xxxxxxxxxx//json_test.cc
void serialize_test() { Json::Value value; value["name"] = "lime"; value["age"] = 18; value["is_student"] = false; value["scores"] = Json::arrayValue; value["scores"].append(90); value["scores"].append(95); value["scores"].append(100); auto str = limeutil::LimeJson::serialize(value); if (str) { std::cout << "序列化成功: " << *str << std::endl; } else { std::cout << "序列化失败" << std::endl; }}
void deserialize_test() { std::string str = R"({"name":"lime","age":18,"is_student":false,"scores":[90,95,100]})"; auto value = limeutil::LimeJson::deserialize(str); if (!value) { std::cout << "反序列化失败" << std::endl; return; } std::cout << (*value)["name"].asString() << std::endl; std::cout << (*value)["age"].asInt() << std::endl; std::cout << (*value)["is_student"].asBool() << std::endl; for (const auto& score : (*value)["scores"]) { std::cout << score.asInt() << " "; } std::cout << std::endl;}
int main() { serialize_test(); deserialize_test(); return 0;}xxxxxxxxxx//makefilejson_test:json_test.cc ../../source/util.cc ../../source/limelog.cc g++ $^ -o $@ -ljsoncpp -lspdlog -lpthread -lfmt -std=c++17clean: rm -f json_test运行结果如下:
xxxxxxxxxxdev@3b5ab207a0b1:~/workspace/cpp-microservice-scaffold/test/jsoncpp$ ./json_test 序列化成功: {"age":18,"is_student":false,"name":"lime","scores":[90,95,100]}lime18090 95 100 二.Protobuf
之后我们会对protobuf进行详细的介绍与使用,这里我们先来简单的了解下,给他使用起来即可。
2.1Protobuf简介
Protobuf 是Google 开发的⼀种轻便、⾼效的结构化数据存储/交换格式,类似于 XML 或 JSON,但⽐它们更⼩、更快、更简单。Protobuf 定义了⼀种接⼝描述语⾔(IDL),⽤于描述数据结构,然后以⾃动⽣成各种编程语⾔的代码来操作这些数据结构。
2.2Protobuf的用途与特性
数据序列化:⽤于⽹络通信、数据存储等场景,将数据结构序列化为字节流。 跨语⾔服务:由于 Protobuf ⽀持多种编程语⾔,它⾮常适合构建跨语⾔的 RPC(远程过程调⽤)服务。 数据兼容性:Protobuf 通过版本控制机制,可以向后兼容旧的数据格式。
2.3安装
xxxxxxxxxxsudo apt install protobuf-compiler libprotobuf-dev#如果需要使⽤grpc相关编译sudo apt install protobuf-compiler-grpc2.4基本语法
我们通过一个简单的例子作以说明:
xxxxxxxxxxsyntax = "proto3";//声明语法版本package example;//定义包名option cc_generic_services = true;//是否启用rpc服务
enum Sex {//定义枚举     man = 0;    woman = 1;};
message Person {//定义消息类型    int32 id = 1;//学号    string name = 2;//姓名    Sex sex = 3;//性别    repeated float scores = 4;//成绩    map<int32, string> courses = 5;//课程};
message PersonRequest {//定义请求消息类型    int32 id = 1;//学号};
message PersonResponse {//定义响应消息类型    Person person = 1;//个人信息};
service PersonService {//定义服务类型    rpc GetPerson (PersonRequest) returns (PersonResponse);//定义rpc方法};
1.描述语法版本:syntax = "proto3"; 2.声明包名称:package example;在C++中的体现就是命名空间的名称 3.开启rpc服务:option cc_generic_services = true; 4.定义枚举字段,编号必须从0开始。 5.定义消息类型Message,字符串–string,整型–int32,浮点型–float,键值对–map<int32,string>,数组repeated int32。
2.5编译
xxxxxxxxxx# protoc# -I, --proto_path=PATH: 指定proto⽂件路径,可以同时多个指定# --cpp_out=OUT_DIRprotoc --cpp_out=./ example.protoprotoc -Iprotobuf --cpp_out=./protobuf/ example.proto2.6向message中的字段进行数据的设置/获取/清除
经过protoc的编译后针对上面的例子会生成两个文件:person.pb.h与person.pb.cc。我们先不提rpc服务相关的接口,我们到后面介绍brpc时再去介绍。这里我们先来说下Protobuf的序列化与反序列化相关的接口: 各个字段相关如果是普通字段(非数组或map),它的使用方法跟我们标准库中的一般没有区别,比如与name字段和id字段的在person.pb.h中的相关部分:
xxxxxxxxxx//person.pb.h  // string name = 2;  void clear_name();  const std::string& name() const;  void set_name(const std::string& value);  void set_name(std::string&& value);  void set_name(const char* value);  void set_name(const char* value, size_t size);  std::string* mutable_name();  std::string* release_name();  void set_allocated_name(std::string* name);  GOOGLE_PROTOBUF_RUNTIME_DEPRECATED("The unsafe_arena_ accessors for"  "    string fields are deprecated and will be removed in a"  "    future release.")  std::string* unsafe_arena_release_name();  GOOGLE_PROTOBUF_RUNTIME_DEPRECATED("The unsafe_arena_ accessors for"  "    string fields are deprecated and will be removed in a"  "    future release.")  void unsafe_arena_set_allocated_name(      std::string* name);  private:  const std::string& _internal_name() const;  void _internal_set_name(const std::string& value);  std::string* _internal_mutable_name();  public:
  // int32 id = 1;  void clear_id();  ::PROTOBUF_NAMESPACE_ID::int32 id() const;  void set_id(::PROTOBUF_NAMESPACE_ID::int32 value);  private:  ::PROTOBUF_NAMESPACE_ID::int32 _internal_id() const;  void _internal_set_id(::PROTOBUF_NAMESPACE_ID::int32 value);  public:
根据字面意思我们便可以知道他们有设置方法set,清除方法clear以及获取字段内容的name()与id()方法,这些都是最常见的使用方法。 对于枚举字段其实也大差不差:
xxxxxxxxxx // .example.Sex sex = 3; void clear_sex(); ::example::Sex sex() const; void set_sex(::example::Sex value); private: ::example::Sex _internal_sex() const; void _internal_set_sex(::example::Sex value); public:也是设置,清除和获取三个方法。 但是对于数组类型我们看:
xxxxxxxxxx // repeated float scores = 4; int scores_size() const; private: int _internal_scores_size() const; public: void clear_scores(); private: float _internal_scores(int index) const; const ::PROTOBUF_NAMESPACE_ID::RepeatedField< float >& _internal_scores() const; void _internal_add_scores(float value); ::PROTOBUF_NAMESPACE_ID::RepeatedField< float >* _internal_mutable_scores(); public: float scores(int index) const; void set_scores(int index, float value); void add_scores(float value); const ::PROTOBUF_NAMESPACE_ID::RepeatedField< float >& scores() const; ::PROTOBUF_NAMESPACE_ID::RepeatedField< float >* mutable_scores();去除private部分:
xxxxxxxxxx // repeated float scores = 4; int scores_size() const; public: void clear_scores(); public: float scores(int index) const; void set_scores(int index, float value); void add_scores(float value); const ::PROTOBUF_NAMESPACE_ID::RepeatedField< float >& scores() const; ::PROTOBUF_NAMESPACE_ID::RepeatedField< float >* mutable_scores();也是设置添加和清空,但是他都是从尾部进行添加的,也就是它的add_scores类似于vector的push_back。当然他也可以去获取数组的指针进行添加也就是上面的后两个方法,一个是获取 const指针,一个是获取非const数组指针,使用后者进行添加:
xxxxxxxxxx//person是我们之前定义的一个message类型,c++中为类也就是Person类,person的实际类型为example::Person auto score = person.mutable_scores(); score->Add(90.0);而对于键值对: 去掉private部分:
xxxxxxxxxx // map<int32, string> courses = 5; int courses_size() const; public: void clear_courses(); public: const ::PROTOBUF_NAMESPACE_ID::Map< ::PROTOBUF_NAMESPACE_ID::int32, std::string >& courses() const; ::PROTOBUF_NAMESPACE_ID::Map< ::PROTOBUF_NAMESPACE_ID::int32, std::string >* mutable_courses();它好像只有清空和获取元素个数这两个接口,没用增加元素接口啊,有的。只不过需要通过上面的最后一个方法获取map的指针对象,然后才能通过insert向键值对中增加数据:
xxxxxxxxxx auto courses = person.mutable_courses();//两种方法添加课程 courses->insert({1001,"C++"}); courses->insert({1002,"Linux"}); courses->insert({1003,"Design Pattern"}); (*courses)[1004] = "Java"; (*courses)[1005] = "Windows"; (*courses)[1006] = "Python";那么在这里我们看一下protobuf底层实际的map相关接口:
xxxxxxxxxxnamespace google {namespace protobuf {template <typename Key, typename T>struct MapPair { MapPair(const Key& other_first, const T& other_second) }; template <typename Key, typename T> class Map { public: using iterator = ....; using const_iterator = ....; iterator begin(); iterator end(); void clear(); size_type size() bool empty() iterator find(const TrivialKey& k) std::pair<iterator, bool> insert(const KeyValuePair& kv) iterator operator[](const TrivialKey& k) void erase(iterator it)};} }2.7Message中提供的序列化与反序列化接口
在protobuf中定义的每个message结构,在编译后都会⽣成⼀个继承于Message类的派⽣类,其内部包含了消息中各个字段的操作接⼝,但是除了这些操作接⼝外,我们还需要了解⼀下这些消息结构所⽣成的派⽣类中继承⽽来的其他操作:
xxxxxxxxxxnamespace google {namespace protobuf {class PROTOBUF_EXPORT Message : public MessageLite { public: std::string GetTypeName() const override; void Clear() override; const Descriptor* GetDescriptor(); const Reflection* GetReflection();};class PROTOBUF_EXPORT MessageLite { public: //对⼀个字符串进⾏解析 bool ParseFromString(const std::string& data); //对⼀块内存空间内的数据进⾏解析 bool ParseFromArray(const void* data, int size); //将proto消息序列化为⼀个string对象保存序列化后的数据 bool SerializeToString(std::string* output) const; //将proto消息序列化到⼀块指定内存空间中 bool SerializeToArray(void* data, int size) const; //对proto消息进⾏序列化并返回序列化后的数据 std::string SerializeAsString() const;//返回空string表⽰出错};} }2.8Protobuf中的工具类
protobuf中的⼯具操作有很多,当前仅贴出了⽤于protobuf和json(另⼀种⾮常流⾏的序列化⽅式,详细了解可以看看脚⼿架的关于jsoncpp的使⽤⽂档)之间的转换接⼝。
xxxxxxxxxxnamespace google {namespace protobuf {namespace util {namespace error {// These values must match error codes defined in google/rpc/code.proto.enum Code { OK = 0, CANCELLED = 1, UNKNOWN = 2, INVALID_ARGUMENT = 3, DEADLINE_EXCEEDED = 4, NOT_FOUND = 5, ALREADY_EXISTS = 6, PERMISSION_DENIED = 7, UNAUTHENTICATED = 16, RESOURCE_EXHAUSTED = 8, FAILED_PRECONDITION = 9, ABORTED = 10, OUT_OF_RANGE = 11, UNIMPLEMENTED = 12, INTERNAL = 13, UNAVAILABLE = 14, DATA_LOSS = 15,};}class PROTOBUF_EXPORT Status {public: bool ok(); StringPiece message(); string ToString();};struct JsonParseOptions { //解析过程中是否忽略未知的JSON字段 bool ignore_unknown_fields; //是否在解析枚举类型时不区分⼤⼩写 bool case_insensitive_enum_parsing;};// 从json格式字符转换proto消息接⼝util::Status JsonStringToMessage(StringPiece input,Message* message,const JsonParseOptions& options);util::Status JsonStringToMessage(StringPiece input,Message* message);struct JsonPrintOptions { //是否添加空⽩字符让json更易读 bool add_whitespace; //是否总是输出基本类型的字段。默认值的基本类型字段在JSON输出中会被省略 bool always_print_primitive_fields; //是否总是将枚举类型作为整数打印。默认情况下,枚举值会被渲染为字符串 bool always_print_enums_as_ints; //是否保留 pb 字段名称,true则使⽤原始名⽽不是根据 JSON 命名约定进⾏转换 bool preserve_proto_field_names; //默认均为false};typedef JsonPrintOptions JsonOptions;// 从proto消息转换为json格式字符串接⼝util::Status MessageToJsonString(const Message& message,std::string* output,const JsonOptions& options);util::Status MessageToJsonString(const Message& message,std::string* output);} } }2.9样例
我们基于上面的接口介绍来写一段protobuf的序列化和反序列化,以及protobuf转json和json转protobuf的示例:
xxxxxxxxxx//serialize.cc/* 1.创建person对象 2.设置person对象的属性 3.将person对象序列化为字符串 //对⼀个字符串进⾏解析 bool ParseFromString(const std::string& data); //对⼀块内存空间内的数据进⾏解析 bool ParseFromArray(const void* data, int size); //将proto消息序列化为⼀个string对象保存序列化后的数据 bool SerializeToString(std::string* output) const; //将proto消息序列化到⼀块指定内存空间中 bool SerializeToArray(void* data, int size) const; //对proto消息进⾏序列化并返回序列化后的数据 std::string SerializeAsString() const;//返回空string表⽰出错*/
std::string serialize_test(){ example::Person person; person.set_id(1001);//设置学号 person.set_name("Alice");//设置姓名 person.set_sex(example::Sex::man);//设置性别 person.add_scores(85.5);//两种方法添加成绩 auto score = person.mutable_scores(); score->Add(90.0); score->Add(95.5); auto courses = person.mutable_courses();//两种方法添加课程 courses->insert({1001,"C++"}); courses->insert({1002,"Linux"}); courses->insert({1003,"Design Pattern"}); (*courses)[1004] = "Java"; (*courses)[1005] = "Windows"; (*courses)[1006] = "Python"; std::string serialized_person; //person.SerializeToString(&serialized_person);//序列化为字符串 serialized_person = person.SerializeAsString(); std::cout << serialized_person << std::endl; return serialized_person;}
void deserialize_test(const std::string serialized_person){ example::Person person; bool success = person.ParseFromString(serialized_person);//解析字符串 if(success == false){ std::cerr << "Failed to parse person." << std::endl; return; } std::cout << "ID: " << person.id() << std::endl; std::cout << "Name: " << person.name() << std::endl; std::cout << "Sex: " << example::Sex_Name(person.sex()) << std::endl; for(auto score : person.scores()){ std::cout << "Score: " << score << std::endl; } for(auto course : person.courses()){ std::cout << "Course: " << course.first << ":" << course.second << std::endl; } std::cout << std::endl; }
example::Person json2pb_test(){ //将JSON字符串解析为proto消息 std::string json_str = R"({ "id": 1001, "name": "Alice", "sex": "man", "scores": [85.5, 90.0, 95.5], "courses": { "1001": "C++", "1002": "Linux", "1003": "Design Pattern", "1004": "Java", "1005": "Windows", "1006": "Python" } })"; example::Person person; google::protobuf::util::JsonParseOptions options; options.ignore_unknown_fields = true;//是否忽略未知字段 options.case_insensitive_enum_parsing = false;//是否在解析枚举类型时不区分⼤⼩写 auto ret = google::protobuf::util::JsonStringToMessage(json_str, &person, options); if (!ret.ok()) { std::cerr << "Failed to parse JSON: " << ret.ToString() << std::endl; return example::Person(); } std::cout << "ID: " << person.id() << std::endl; std::cout << "Name: " << person.name() << std::endl; std::cout << "Sex: " << example::Sex_Name(person.sex()) << std::endl; std::cout << std::endl; return person;}
void pb2json_test(const example::Person& person){ //将proto消息序列化为JSON字符串 std::string json_str; google::protobuf::util::JsonPrintOptions options; options.add_whitespace = false;//是否添加空白字符 options.always_print_primitive_fields = true;//是否总是输出基本类型的字段。默认值的基本类型字段在JSON输出中会被省略 options.always_print_enums_as_ints = false;//是否总是将枚举类型作为整数打印。默认情况下,枚举值会被渲染为字符串 options.preserve_proto_field_names = true;//是否保留 pb 字段名称,true则使⽤原始名⽽不是根据 JSON 命名约定进⾏转换 auto ret = google::protobuf::util::MessageToJsonString(person, &json_str,options); if (!ret.ok()) { std::cerr << "Failed to serialize message: " << ret.ToString() << std::endl; return; } std::cout << json_str << std::endl;}
int main(){ auto str = serialize_test(); deserialize_test(str); auto person = json2pb_test(); pb2json_test(person); return 0;}makefile:
xxxxxxxxxxserialize:serialize.cc person.pb.cc g++ $^ -o $@ -std=c++17 -lprotobuf -lpthreadclean: rm -f serialize运行之后我们能看到如下结果:
xxxxxxxxxxdev@3b5ab207a0b1:~/workspace/cpp-microservice-scaffold/example/protobuf$ ./serialize  Alice"        B B B*              Windows*                      Pytho C++* Linux Design Pattern*  JavaID: 1001Name: AliceSex: manScore: 85.5Score: 90Score: 95.5Course: 1005:WindowsCourse: 1006:PythonCourse: 1001:C++Course: 1002:LinuxCourse: 1003:Design PatternCourse: 1004:Java
ID: 1001Name: AliceSex: man
{"id":1001,"name":"Alice","sex":"man","scores":[85.5,90,95.5],"courses":{"1005":"Windows","1006":"Python","1001":"C++","1002":"Linux","1003":"Design Pattern","1004":"Java"}}
由于protobuf序列化生成的是纯二进制数据,因此初始序列化结果显示为乱码。
三.Cpp-httplib
C++ HTTP 库(cpp-httplib)是⼀个轻量级的C++ HTTP 客⼾端/服务器库,它提供了简单的 API 来创建 HTTP 服务器和客⼾端,⽀持同步和异步操作。它的使用非常简单。 cpp-httplib 有⼀个活跃的社区,最近一次更新是几天前,有兴趣的读者可以去github上搜索Cpp-httplib,第一个就是我们本项目中用到的这个三方库。
3.1安装
xxxxxxxxxxdev@dev-host:~/workspace$ git clone https://github.com/yhirose/cpp-httplib.git3.2使用
它的使用安装之后不需要连接任何的三方库,只需要包含头文件:
xxxxxxxxxx即可直接使用。 它的接口定义也非常清晰明了,核心接口与相关类如下:
xxxxxxxxxxnamespace httplib {using Range = std::pair<ssize_t, ssize_t>;using Ranges = std::vector<Range>;struct MultipartFormData { std::string name; std::string content;std::string filename;std::string content_type;};using MultipartFormDataItems = std::vector<MultipartFormData>;using MultipartFormDataMap = std::multimap<std::string, MultipartFormData>;using Params = std::multimap<std::string, std::string>;using Match = std::smatch;struct Request { std::string method; std::string path; Headers headers; std::string body; Params params; MultipartFormDataMap files; Ranges ranges; Match matches;} struct Response { std::string version; int status = -1; std::string reason; Headers headers; std::string body; void set_content(const std::string &s, const std::string &content_type); void set_header(const std::string &key, const std::string &val);} class Server { using Handler = std::function<void(const Request &, Response &)>; bool set_mount_point(const std::string &mount_point, const std::string &dir, Headers headers = Headers()); Server &Get(const std::string &pattern, Handler handler); Server &Post(const std::string &pattern, Handler handler); Server &Put(const std::string &pattern, Handler handler); Server &Delete(const std::string &pattern, Handler handler); bool listen(const std::string &host, int port);} class Client { explicit Client(const std::string &host, int port); Result Get(const std::string &path, const Headers &headers); Result Get(const std::string &path, const Params ¶ms, const Headers &headers, Progress progress = nullptr); Result Post(const std::string &path, const std::string &body,const std::string &content_type); Result Post(const std::string &path, const Params ¶ms); Result Post(const std::string &path, const Headers &headers, const Params ¶ms); Result Post(const std::string &path, const MultipartFormDataItems &items); Result Put(const std::string &path, const std::string &body, const std::string &content_type); Result Delete(const std::string &path, const std::string &body, const std::string &content_type);} class Result { operator bool() const { return res_ != nullptr; } const Response &value() const { return *res_; } Response &value() { return *res_; } const Response &operator*() const { return *res_; } Response &operator*() { return *res_; } const Response *operator->() const { return res_.get(); } Response *operator->() { return res_.get(); }} }它的实现原理可以由一张图进行概况:
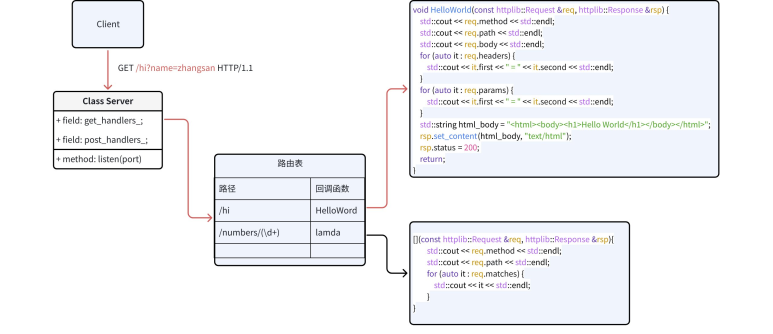
3.3使用样例
xxxxxxxxxx/* 1.创建server对象 2.设置监听端口 3.设置路由 4.启动服务*/
void HelloWorld(const httplib::Request& req, httplib::Response& res) { std::cout << req.method << " " << req.path << std::endl;//打印请求方法与请求路径 std::cout << req.body << std::endl;//打印请求body for(auto& header : req.headers) { std::cout << header.first << ": " << header.second << std::endl;//打印请求头 } for(auto& param : req.params) { std::cout << param.first << ": " << param.second << std::endl;//打印查询字符串 } // httplib::Response 没有 set_version 方法,HTTP 版本由 httplib::Server 自动处理,无法手动设置 std::string html_str = "<html><body><h1>Hello, World!</h1></body></html>"; res.set_content(html_str, "text/html");//设置响应内容及类型 res.status = 200;//设置响应状态码 return;}
int main(){ httplib::Server svr; svr.Get("/hi",HelloWorld); //当请求是向客户端索取文件时,不需要一个个的去进行注册,使用正则表达式即可 svr.Get("/number/(\\d+)",[](const httplib::Request& req, httplib::Response& res){ std::cout << req.method << " " << req.path << std::endl;//打印请求方法与请求路径 std::cout << req.body << std::endl;//打印请求body for(auto& item : req.matches){ std::cout << item << std::endl;//打印正则表达式匹配结果 } std::string html_str = "<html><body><h1>Hello, World!</h1></body></html>"; res.set_content(html_str, "text/html");//设置响应内容及类型 res.status = 200;//设置响应状态码 }); svr.listen("0.0.0.0", 9000); return 0;}makefile:
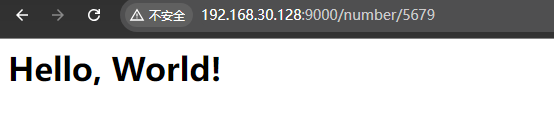
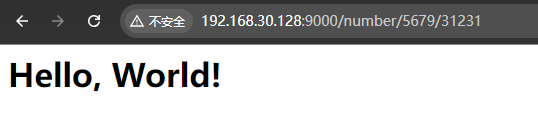
xxxxxxxxxxserver:server.cc g++ $^ -o $@ -std=c++17 -lpthreadclean: rm -f server运行后我们用浏览器访问http://你的服务器ip:9000/hi或者/1232131等任意数字都会呈现如下图所示的界面:
 控制台输出:
xxxxxxxxxxdev@3b5ab207a0b1:~/workspace/cpp-microservice-scaffold/example/httplib$ ./server GET /hi
REMOTE_PORT: 53484Accept-Encoding: gzip, deflateAccept: text/html,application/xhtml+xml,application/xml;q=0.9,image/avif,image/webp,image/apng,*/*;q=0.8,application/signed-exchange;v=b3;q=0.7LOCAL_PORT: 9000User-Agent: Mozilla/5.0 (Windows NT 10.0; Win64; x64) AppleWebKit/537.36 (KHTML, like Gecko) Chrome/127.0.0.0 Safari/537.36REMOTE_ADDR: 192.168.30.1Upgrade-Insecure-Requests: 1LOCAL_ADDR: 172.18.0.2Accept-Language: zh-CN,zh;q=0.9Connection: keep-aliveHost: 192.168.30.128:9000GET /number/5679
/number/56795679
四.websocket
4.1基本认识
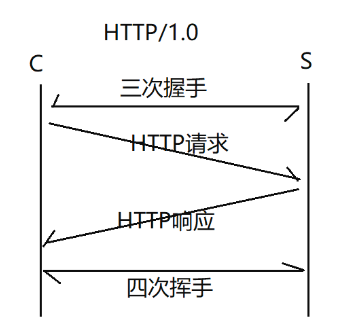
我们都知道,一次http请求大致是如下的流程:
 也就是说,如果接下来服务端想要找到客户端发送消息给他,此时服务端就找不到原来的客户端了。比如我们平时通信的场景:
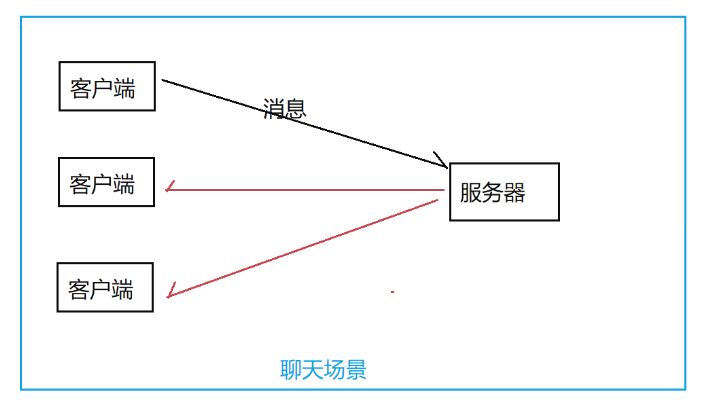 那有人说让客户端发起多次http请求,不断去询问服务端有没有新消息不就ok了。显然是不可以的,第一个原因便是占用资源多,第二个原因便是不够实时。所以短连接是无法达成这个目标的。此时我们就需要使用websocket协议:长连接通信来达到服务端能够主动给客户端发消息的目的。它的大致流程如下:
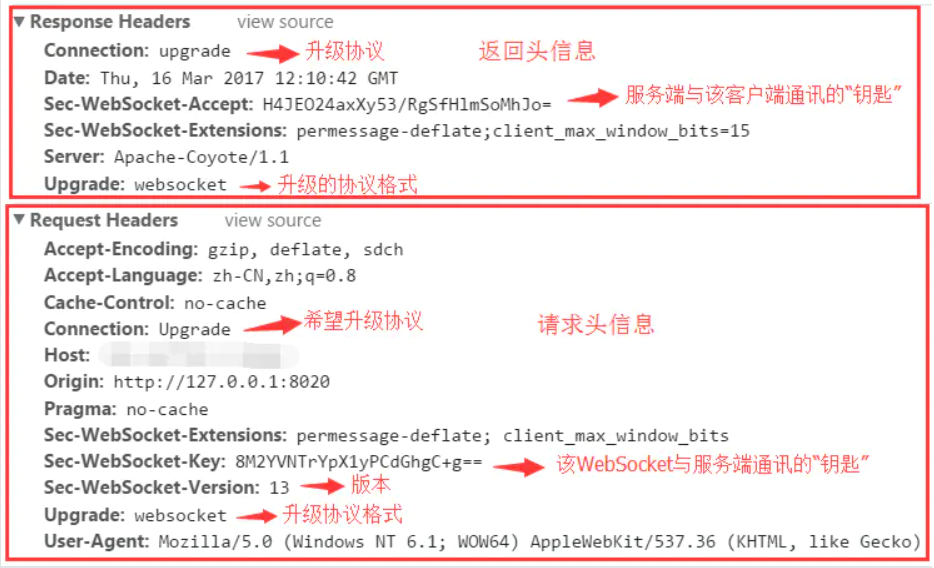
 具体协议升级的过程如下:
 它的报文格式如下:
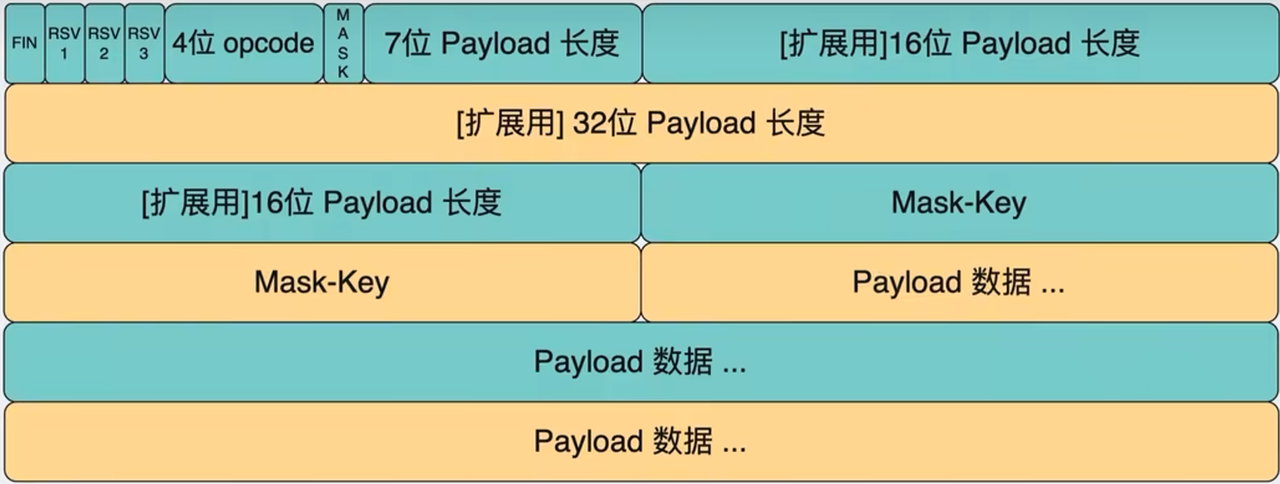 字段比较多,我们只关注几个比较主要的字段:
FIN: WebSocket传输数据以消息为概念单位,⼀个消息有可能由⼀个或多个帧组成,FIN字段为1表⽰末尾帧。
RSV1~3:保留字段,只在扩展时使⽤,若未启⽤扩展则应置1,若收到不全为0的数据帧,且未协商扩展则⽴即终⽌连接
opcode: 标志当前数据帧的类型
◦ 0x0: 表⽰这是个延续帧,当 opcode 为 0 表⽰本次数据传输采⽤了数据分⽚,当前收到的帧为其中⼀个分⽚
◦ 0x1: 表⽰这是⽂本帧
◦ 0x2: 表⽰这是⼆进制帧
◦ 0x3-0x7: 保留,暂未使⽤
◦ 0x8: 表⽰连接断开
◦ 0x9: 表⽰ ping 帧
◦ 0xa: 表⽰ pong 帧
◦ 0xb-0xf: 保留,暂未使⽤
mask:表⽰Payload数据是否被编码,若为1则必有Mask-Key,⽤于解码Payload数据。仅客⼾端发送给服务端的消息需要设置。
Payload length:数据载荷的⻓度,单位是字节, 有可能为7位、7+16位、7+64位。假设Payload length = x
◦ x为0~126:数据的⻓度为x字节
◦ x为126:后续2个字节代表⼀个16位的⽆符号整数,该⽆符号整数的值为数据的⻓度
◦ x为127:后续8个字节代表⼀个64位的⽆符号整数(最⾼位为0),该⽆符号整数的值为数据的
⻓度
Mask-Key:当mask为1时存在,⻓度为4字节,解码规则: DECODED[i] = ENCODED[i] ^ MASK[i
% 4]
Payload data: 报⽂携带的载荷数据
字段比较多,我们只关注几个比较主要的字段:
FIN: WebSocket传输数据以消息为概念单位,⼀个消息有可能由⼀个或多个帧组成,FIN字段为1表⽰末尾帧。
RSV1~3:保留字段,只在扩展时使⽤,若未启⽤扩展则应置1,若收到不全为0的数据帧,且未协商扩展则⽴即终⽌连接
opcode: 标志当前数据帧的类型
◦ 0x0: 表⽰这是个延续帧,当 opcode 为 0 表⽰本次数据传输采⽤了数据分⽚,当前收到的帧为其中⼀个分⽚
◦ 0x1: 表⽰这是⽂本帧
◦ 0x2: 表⽰这是⼆进制帧
◦ 0x3-0x7: 保留,暂未使⽤
◦ 0x8: 表⽰连接断开
◦ 0x9: 表⽰ ping 帧
◦ 0xa: 表⽰ pong 帧
◦ 0xb-0xf: 保留,暂未使⽤
mask:表⽰Payload数据是否被编码,若为1则必有Mask-Key,⽤于解码Payload数据。仅客⼾端发送给服务端的消息需要设置。
Payload length:数据载荷的⻓度,单位是字节, 有可能为7位、7+16位、7+64位。假设Payload length = x
◦ x为0~126:数据的⻓度为x字节
◦ x为126:后续2个字节代表⼀个16位的⽆符号整数,该⽆符号整数的值为数据的⻓度
◦ x为127:后续8个字节代表⼀个64位的⽆符号整数(最⾼位为0),该⽆符号整数的值为数据的
⻓度
Mask-Key:当mask为1时存在,⻓度为4字节,解码规则: DECODED[i] = ENCODED[i] ^ MASK[i
% 4]
Payload data: 报⽂携带的载荷数据
4.2websocketpp介绍
WebSocketpp是⼀个跨平台的开源(BSD许可证)头部专⽤C++库,它实现了RFC645(WebSocket协议)和RFC7692(WebSocketCompression Extensions)。它允许将WebSocket客⼾端和服务器功能集成到C++程序中。在最常⻅的配置中,全功能⽹络I/O由Asio⽹络库提供。 WebSocketpp同时⽀持HTTP和Websocket两种⽹络协议, ⽐较适⽤于我们本次的项⽬, 所以我们选⽤该库作为项⽬的依赖库⽤来搭建HTTP和WebSocket服务器。 该项目的相关网站如下: github:https://github.com/zaphoyd/websocketpp 用户手册:http://docs.websocketpp.org/ 官网:http://www.zaphoyd.com/websocketpp
4.2.1常用接口介绍
服务器类:
xxxxxxxxxx
namespace websocketpp{    typedef lib::weak_ptr<void> connection_hdl;    template <typename config>    class endpoint : public config::socket_type    {        typedef lib::shared_ptr<lib::asio::steady_timer> timer_ptr;        typedef typename connection_type::ptr connection_ptr;        typedef typename connection_type::message_ptr message_ptr;        typedef lib::function<void(connection_hdl)> open_handler;        typedef lib::function<void(connection_hdl)> close_handler;        typedef lib::function<void(connection_hdl)> http_handler;        typedef lib::function<void(connection_hdl, message_ptr)>            message_handler;        /* websocketpp::log::alevel::none 禁⽌打印所有⽇志*/        void set_access_channels(log::level channels);   /*设置⽇志打印等级*/        void clear_access_channels(log::level channels); /*清除指定等级的⽇志*/        /*设置指定事件的回调函数*/        void set_open_handler(open_handler h);       /*websocket握⼿成功回调处理函数*/        void set_close_handler(close_handler h);     /*websocket连接关闭回调处理函数                                                      */        void set_message_handler(message_handler h); /*websocket消息回调处理函数                                                      */        void set_http_handler(http_handler h);       /*http请求回调处理函数*/        /*发送数据接⼝*/        void send(connection_hdl hdl, std::string &payload,                  frame::opcode::value op);        void send(connection_hdl hdl, void *payload, size_t len,                  frame::opcode::value op);        /*关闭连接接⼝*/        void close(connection_hdl hdl, close::status::value code,                   std::string &reason);        /*获取connection_hdl 对应连接的connection_ptr*/        connection_ptr get_con_from_hdl(connection_hdl hdl);        /*websocketpp基于asio框架实现,init_asio⽤于初始化asio框架中的io_service调        度器*/        void init_asio();        /*设置是否启⽤地址重⽤*/        void set_reuse_addr(bool value);        /*设置endpoint的绑定监听端⼝*/        void listen(uint16_t port);        /*对io_service对象的run接⼝封装,⽤于启动服务器*/        std::size_t run();        /*websocketpp提供的定时器,以毫秒为单位*/        timer_ptr set_timer(long duration, timer_handler callback);    };    template <typename config>    class server : public endpoint<connection<config>, config>    {        /*初始化并启动服务端监听连接的accept事件处理*/        void start_accept();    };    namespace message_buffer    {        /*获取websocket请求中的payload数据类型*/        frame::opcode::value get_opcode();        /*获取websocket中payload数据*/        std::string const &get_payload();    }}
日志等级:
WebSocketPP库内置了自己的日志模块(无法替换,除非修改库内所有日志输出代码并重新编译安装)。这里我们主要关注其日志级别设置,通过禁用不必要的日志输出来避免运行时大量日志干扰核心信息查看。
xxxxxxxxxxnamespace log {struct alevel { static level const none = 0x0; static level const connect = 0x1; static level const disconnect = 0x2; static level const control = 0x4; static level const frame_header = 0x8; static level const frame_payload = 0x10; static level const message_header = 0x20; static level const message_payload = 0x40; static level const endpoint = 0x80; static level const debug_handshake = 0x100; static level const debug_close = 0x200; static level const devel = 0x400; static level const app = 0x800; static level const http = 0x1000; static level const fail = 0x2000; static level const access_core = 0x00003003; static level const all = 0xffffffff;};}连接对象:
xxxxxxxxxx
template <typename config>class connection    : public config::transport_type::transport_con_type,      public config::connection_base{    /*发送数据接⼝*/    error_code send(std::string &payload, frame::opcode::value                                              op = frame::opcode::text); /*获取http请求头部*/    std::string const &get_request_header(std::string const &key)        /*获取请求正⽂*/        std::string const &get_request_body();    /*设置响应状态码*/    void set_status(http::status_code::value code);    /*设置http响应正⽂*/    void set_body(std::string const &value);    /*添加http响应头部字段*/    void append_header(std::string const &key, std::string const &val);    /*获取http请求对象*/    request_type const &get_request();    /*获取connection_ptr 对应的 connection_hdl */    connection_hdl get_handle();};namespace frame{    namespace opcode    {        enum value        {            continuation = 0x0,            text = 0x1,            binary = 0x2,            ...             close = 0x8,            ping = 0x9,            pong = 0xA,            ...        };    }}
http相关:
xxxxxxxxxxnamespace http {namespace parser { class parser { std::string const & get_header(std::string const & key); std::string const & get_body(); typedef std::map<std::string, std::string, utility::ci_less> header_list; header_list const & get_headers(); } class request : public parser { /*获取请求⽅法*/ std::string const & get_method() /*获取请求uri接⼝*/ std::string const & get_uri() }; }}namespace http {namespace status_code {enum value { uninitialized = 0, continue_code = 100, switching_protocols = 101, ok = 200, created = 201, accepted = 202, non_authoritative_information = 203, no_content = 204, reset_content = 205, partial_content = 206, multiple_choices = 300, moved_permanently = 301, found = 302, see_other = 303, not_modified = 304, use_proxy = 305, temporary_redirect = 307, bad_request = 400, unauthorized = 401, payment_required = 402, forbidden = 403, not_found = 404, method_not_allowed = 405, not_acceptable = 406, proxy_authentication_required = 407, request_timeout = 408, conflict = 409, gone = 410, length_required = 411, precondition_failed = 412, request_entity_too_large = 413, request_uri_too_long = 414, unsupported_media_type = 415, request_range_not_satisfiable = 416, expectation_failed = 417, im_a_teapot = 418, upgrade_required = 426, precondition_required = 428, too_many_requests = 429, request_header_fields_too_large = 431, internal_server_error = 500, not_implemented = 501, bad_gateway = 502, service_unavailable = 503, gateway_timeout = 504, http_version_not_supported = 505, not_extended = 510, network_authentication_required = 511};}}4.3搭建一个简单的http/websocket服务器
服务端:
xxxxxxxxxx//server.cc/* 实现一个简单的websocket服务器,监听端口9000,接收客户端的连接请求,并返回消息。 0.实现回调函数 1.创建websocket server对象 2.设置websocket的日志输出 3.初始化asio 3.5启用地址重用 4.注册回调函数 5.监听端口 6.初始化并启动服务端监听连接的accept事件处理 7.开始运行服务器*/
typedef websocketpp::server<websocketpp::config::asio> server;
void onOpen(server *s, websocketpp::connection_hdl hdl){ std::cout << "websocket连接成功!!" << std::endl;}
void onClose(server *s, websocketpp::connection_hdl hdl){ std::cout << "websocket连接断开!!" << std::endl;}
void onMessage(server *s, websocketpp::connection_hdl hdl, server::message_ptr msg){ // 因为websocket是由http协议升级而来,所以我们可以获取升级前的最后一次http请求的信息 // 1.获取连接对象-因为hdl是一个weak_ptr,所以需要通过get_con_from_hdl获取连接对象(shared_ptr) auto conn = s->get_con_from_hdl(hdl); // 2.获取请求信息 auto req = conn->get_request(); // 3.获取请求路径 std::cout << req.get_uri() << std::endl; // 4.获取请求方法 std::cout << req.get_method() << std::endl; // 5.获取请求头 for (const auto &header : req.get_headers()) { std::cout << header.first << ":" << header.second << std::endl; } // websocket消息内容 msg->get_payload(); std::cout << "收到websocket消息:" << msg->get_payload() << std::endl; // 发送消息给客户端 std::string send_msg = "回显消息:" + msg->get_payload(); // 指定发送消息的类型为文本消息(websocketpp::frame::opcode::text)还是二进制消息(websocketpp::frame::opcode::binary) s->send(hdl, send_msg, websocketpp::frame::opcode::text);}
void onHttp(server *s, websocketpp::connection_hdl hdl){ std::cout << "收到http请求!!" << std::endl; // 1.获取连接对象-因为hdl是一个weak_ptr,所以需要通过get_con_from_hdl获取连接对象(shared_ptr) auto conn = s->get_con_from_hdl(hdl); // 2.获取请求信息 auto req = conn->get_request(); // 3.获取请求路径 std::cout << req.get_uri() << std::endl; // 4.获取请求方法 std::cout << req.get_method() << std::endl; // 5.获取请求头 for (const auto &header : req.get_headers()) { std::cout << header.first << ":" << header.second << std::endl; } // 6.设置一个简单的hello world响应 conn->set_status(websocketpp::http::status_code::ok); conn->set_body("<html><body><h1>Hello, World!</h1></body></html>"); conn->append_header("Content-Type", "text/html");}
int main(){ // 1.创建websocket server对象 server websocket_server; // 2.设置websocket的日志输出--log::alevel::none表示不输出任何日志 websocket_server.clear_access_channels(websocketpp::log::alevel::all); // 3.初始化asio websocket_server.init_asio(); // 3.5启用地址重用 websocket_server.set_reuse_addr(true); // 4.注册回调函数 websocket_server.set_open_handler(std::bind(&onOpen, &websocket_server, std::placeholders::_1)); websocket_server.set_close_handler(std::bind(&onClose, &websocket_server, std::placeholders::_1)); websocket_server.set_message_handler(std::bind(&onMessage, &websocket_server, std::placeholders::_1, std::placeholders::_2)); websocket_server.set_http_handler(std::bind(&onHttp, &websocket_server, std::placeholders::_1)); // 处理http请求 // 5.监听端口 websocket_server.listen(9000); // 6.初始化并启动服务端监听连接的accept事件处理 websocket_server.start_accept(); // 7.开始运行服务器 websocket_server.run(); return 0;}makefile:
xxxxxxxxxxserver:server.cc g++ $^ -o $@ -lboost_system -lpthreadclean: rm -f server注意因为websocket是顺带实现http相关接口的,所以路由什么的工作都需要我们自己去完成。我们这里运行server之后搁网址里面在http:://你的服务器地址:9000之后加上无论什么他都会给你返回个hello world,因为这里我们是简单的实现了下,并没有作任何路由:
 控制台输出如下:
xxxxxxxxxxdev@3b5ab207a0b1:~/workspace/cpp-microservice-scaffold/example/websockerpp$ ./server 收到http请求!!/number/5679GETAccept:text/html,application/xhtml+xml,application/xml;q=0.9,image/avif,image/webp,image/apng,*/*;q=0.8,application/signed-exchange;v=b3;q=0.7Accept-Encoding:gzip, deflateAccept-Language:zh-CN,zh;q=0.9Connection:keep-aliveHost:192.168.30.128:9000Upgrade-Insecure-Requests:1User-Agent:Mozilla/5.0 (Windows NT 10.0; Win64; x64) AppleWebKit/537.36 (KHTML, like Gecko) Chrome/127.0.0.0 Safari/537.36收到http请求!!/number/5679/31231GETAccept:text/html,application/xhtml+xml,application/xml;q=0.9,image/avif,image/webp,image/apng,*/*;q=0.8,application/signed-exchange;v=b3;q=0.7Accept-Encoding:gzip, deflateAccept-Language:zh-CN,zh;q=0.9Connection:keep-aliveHost:192.168.30.128:9000Upgrade-Insecure-Requests:1User-Agent:Mozilla/5.0 (Windows NT 10.0; Win64; x64) AppleWebKit/537.36 (KHTML, like Gecko) Chrome/127.0.0.0 Safari/537.36[2025-10-05 19:50:36] [error] handle_read_handshake error: websocketpp.transport:7 (End of File)如果我们想要看到websocket通信,可以使用下面的html代码进行,注意服务器地址改成你自己的:
xxxxxxxxxx<!DOCTYPE html><html lang="en">
<head> <meta charset="UTF-8"> <meta http-equiv="X-UA-Compatible" content="IE=edge"> <meta name="viewport" content="width=device-width, initial-scale=1.0"> <title>Test Websocket</title></head>
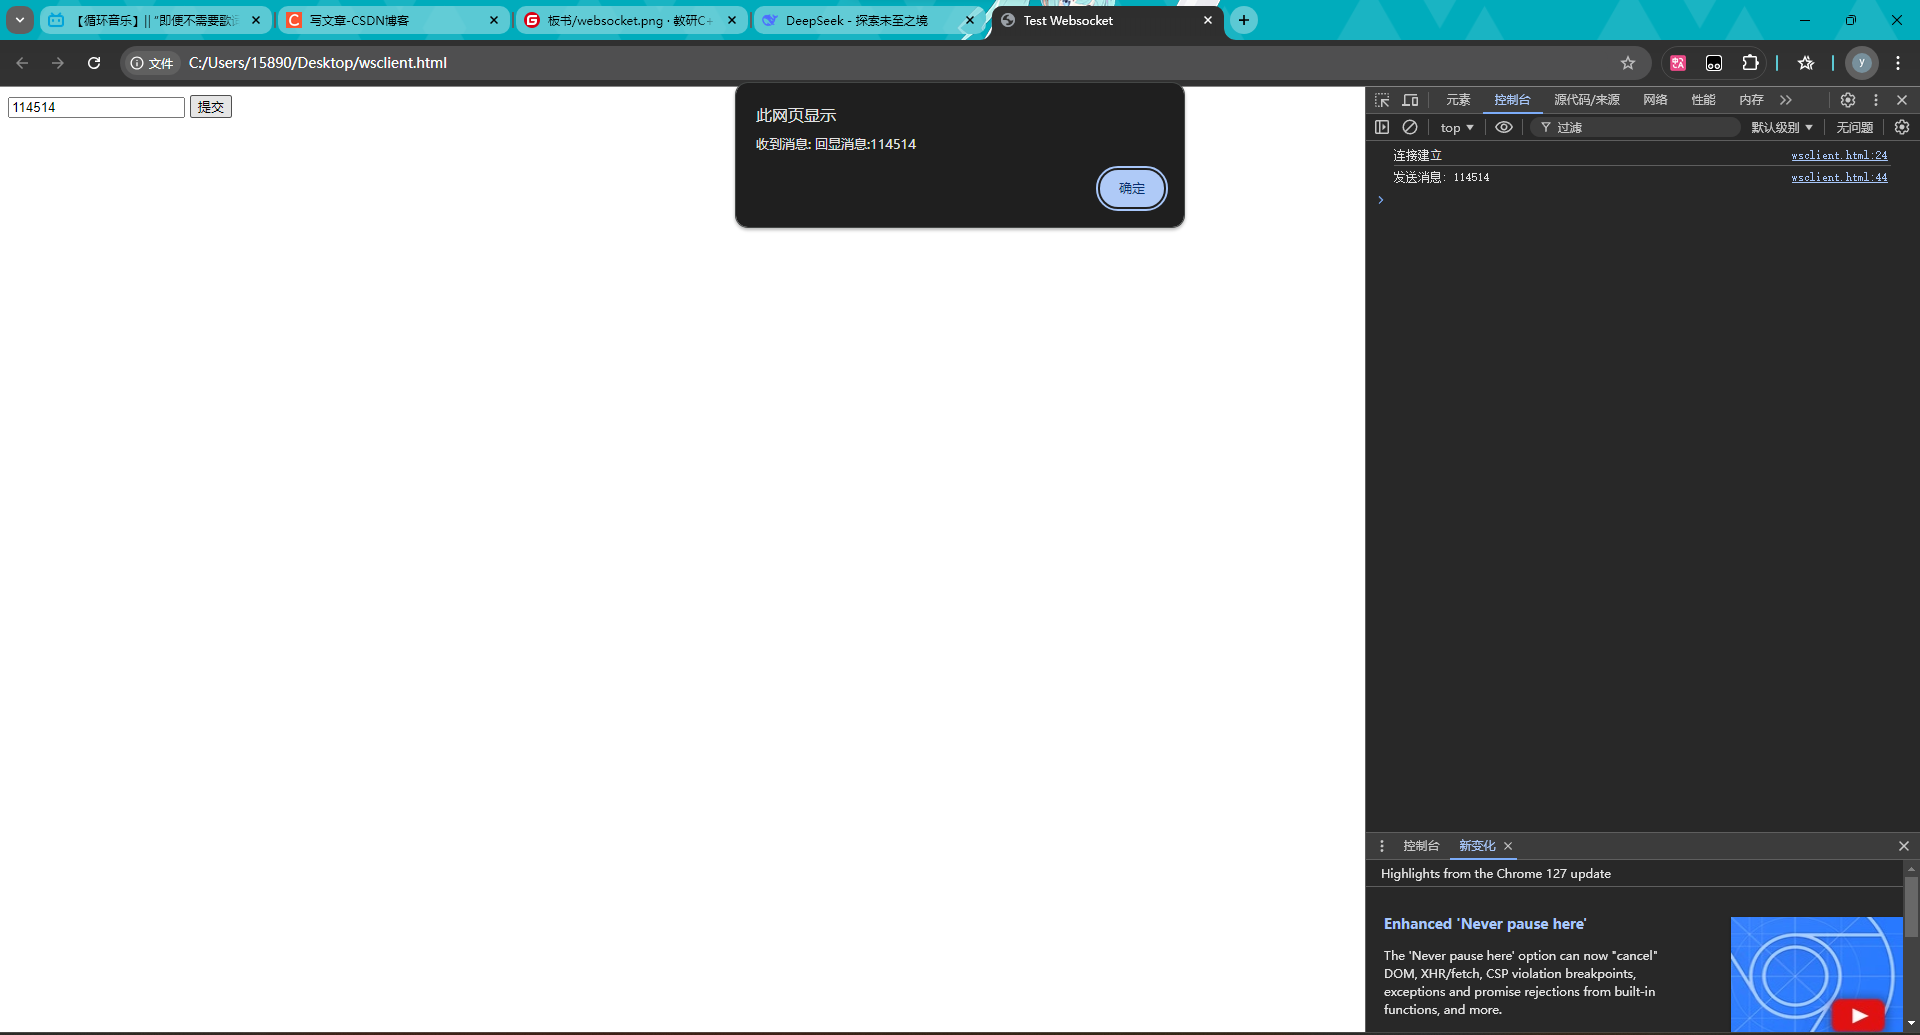
<body> <input type="text" id="message"> <button id="submit">提交</button> <script> // 创建 websocket 实例 // ws://192.168.51.100:8888 // 类⽐http // ws表⽰websocket协议 // 192.168.51.100 表⽰服务器地址 // 8888表⽰服务器绑定的端⼝ let websocket = new WebSocket("ws://192.168.30.128:9000"); // 处理连接打开的回调函数 websocket.onopen = function () { console.log("连接建⽴"); } // 处理收到消息的回调函数 // 控制台打印消息 websocket.onmessage = function (e) { //console.log("收到消息: " + e.data); alert("收到消息: " + e.data); } // 处理连接异常的回调函数 websocket.onerror = function () { console.log("连接异常"); } // 处理连接关闭的回调函数 websocket.onclose = function () { console.log("连接关闭"); } // 实现点击按钮后, 通过 websocket实例 向服务器发送请求 let input = document.querySelector('#message'); let button = document.querySelector('#submit'); button.onclick = function () { console.log("发送消息: " + input.value); websocket.send(input.value); } </script></body></html>服务端保持运行的情况下,用浏览器打开这段html会显示如下内容:
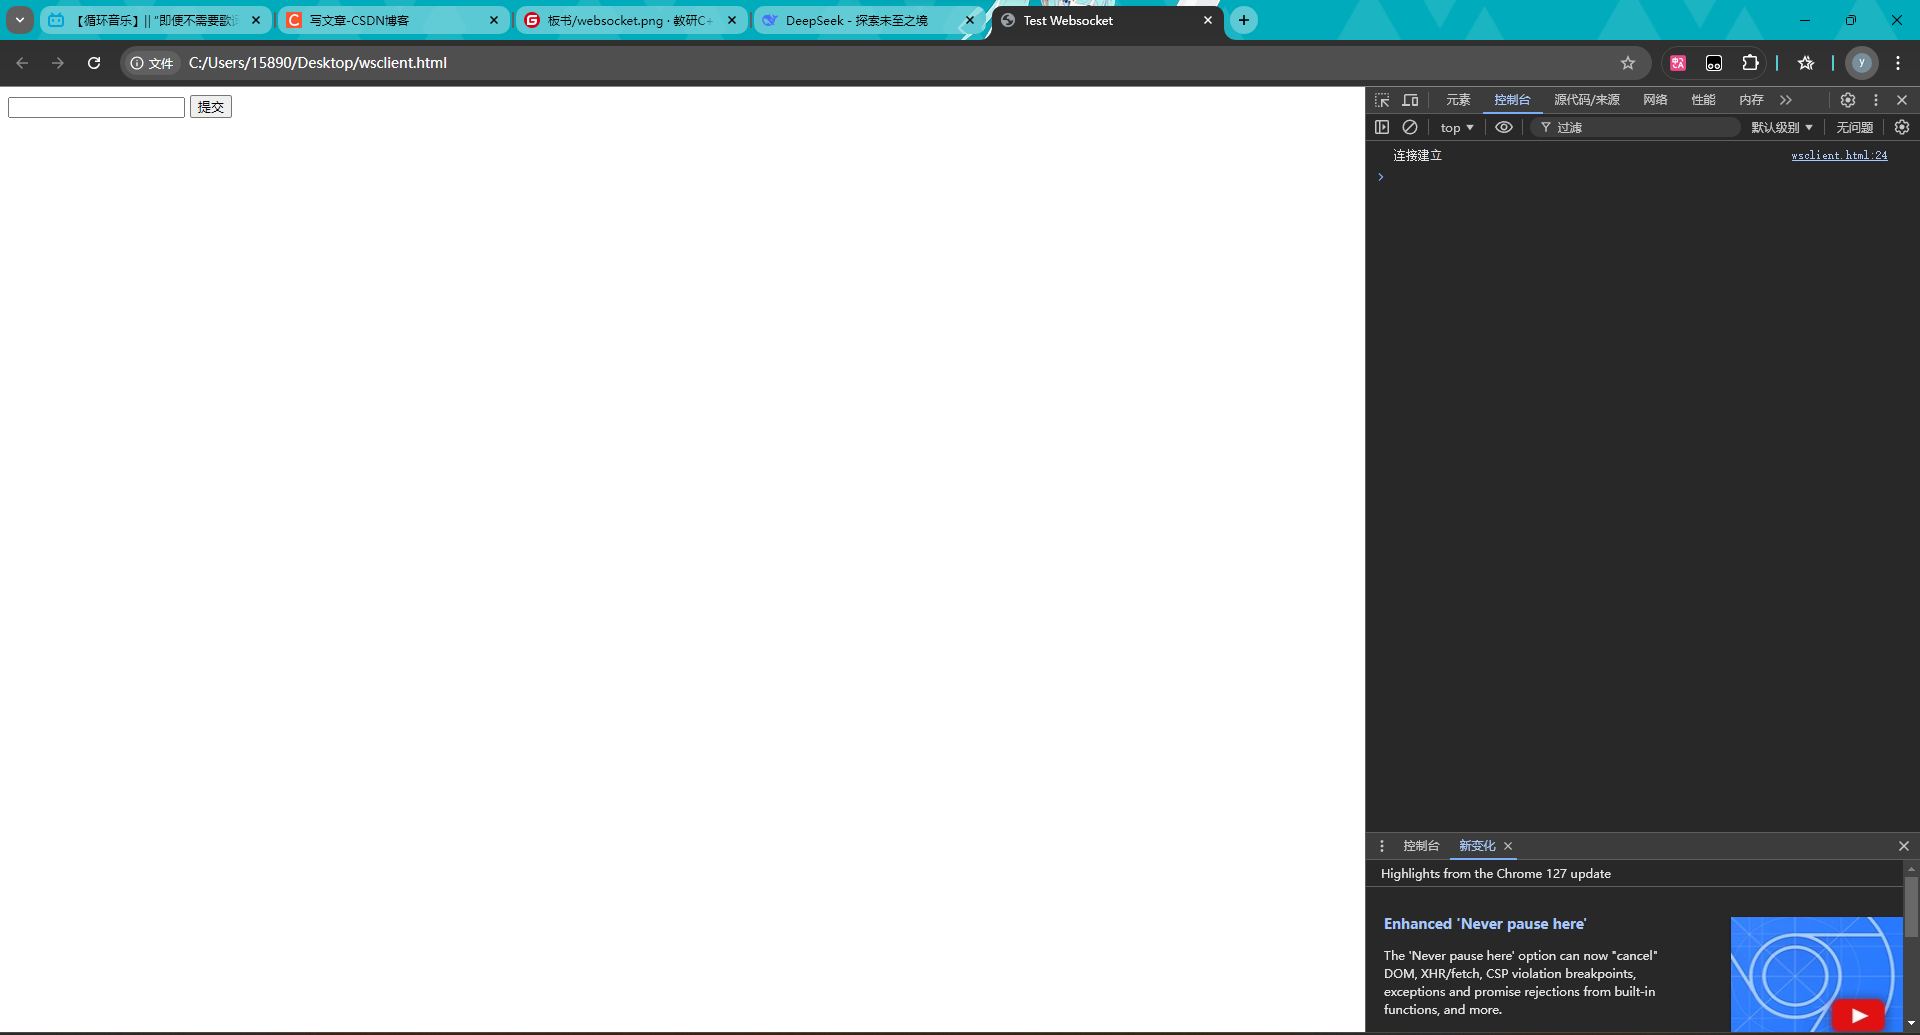 当我们提交内容后显示效果如下:

评论(已关闭)
评论已关闭